Hadabot is a robot kit for those looking to actively learn ROS 2 / ROS2 and robotics while building a robot.
As you read about Hadabot progress, let's first define who exactly Hadabot is intended for. Hadabot wouldn't exist if it didn't scratch a personal itch. I am a software engineer with a degree in computer science and decades of software engineering experience in the industry. While I have a strong interest in robotics, I do not have formal academic trainings in the field of robotics. In order to learn robotics concepts, I rely on applying what was taught in a specific MOOCs or textbook through the robot I'm building. I learn by doing.
Hadabot is an extension of this learning approach. You, the reader, are likely like me, a software engineer with decent programming chops. You have a strong desire to learn robotics. But you also understand the pareto effect of learning. If we learn enough to firmly grasp the intuition of a formal proof or theory, we can start building and hold constructive conversations with other roboticists to solve real-world problems.
Robot navigation is arguably one of the most impactful robotics concepts which you can learn through building a Hadabot. With my post updates so far, I've been putting together the pieces needed to learn robot navigation on a Hadabot. In order to have the Hadabot navigate itself, we need to know how fast it's going and where it is in the world - otherwise known as robot odometry.
Speed sensors help determine odometry. On the Hadabot, we'll be using wheel encoders to sense speed. In this post, I will:
-
Describe what a wheel encoder is, what it measures, how it's wired to the Hadabot's ESP32 microcontroller.
-
Kick off an example to compute and publish the Hadabot's wheels' rotational velocity through a web interface as well as with ROS2 commands.
-
Explain how rotational velocity is computed using the wheel encoder sensor data.
-
How the wheel's rotational velocity will contribute to odometry and robot navigation.
It should take 15 to 20 minutes to follow along with the examples and read this post.
1. The Hadabot wheel encoder sensor
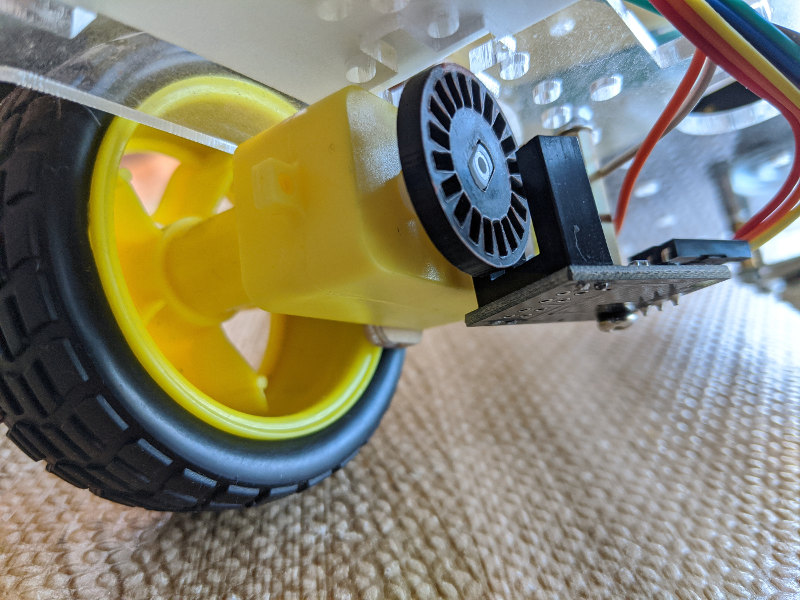
Wheel encoders measure how much a wheel has turned. An encoder usually uses a disk divided up into sections or arcs. This disk is mounted to the rotating part of the wheel, either on the wheel itself or the shaft of the motor. As the wheel / motor spins, it also spins the encoder disk. The sensor on the encoder detects the crossing from one section or arc to another which is colloquially called a tick. Each tick represents the amount a wheel has spun depending on how many arcs divide up the entire disk. If there are 10 total ticks per disk, then if the sensor detected the passing of 10 ticks, then the wheel has spun 1 revolution.
The encoder sensor we use has 3 pins. One for power, one for ground, another for the sensor output. For each tick, the signal from the sensor transitions - goes from either high to low, or low to high. Being a simple encoder sensor, it cannot detect which direction the wheel is spinning. The Hadabot ESP32 microcontroller is connected to each encoder's sensor pin in the following manner:
| Wheel | Encoder sensor pin |
|---|---|
| Left | ESP32 GPIO 16 |
| Right | ESP32 GPIO 17 |
By sample the total number of tick counts for each wheel at certain time deltas, the ESP32 can determine the rotational velocity of each wheel at the sampled rate, measured as radians per second. The rotational velocity is then published out to ROS2 over ROS2 topics - more on that later.
2. Run the wheel encoder example
Before we run the example, we need to prep 2 things - follow steps 2 and 3 to (1) Update, start the Hadabot ROS2 software stack and web-bash terminal and (2) Update the Hadabot's ESP32 with the latest firmware.
Run guided script to kick off example
As with all previous examples in past posts, we will run a Hadabot guided script from the web-bash terminal that's been idling in the background.
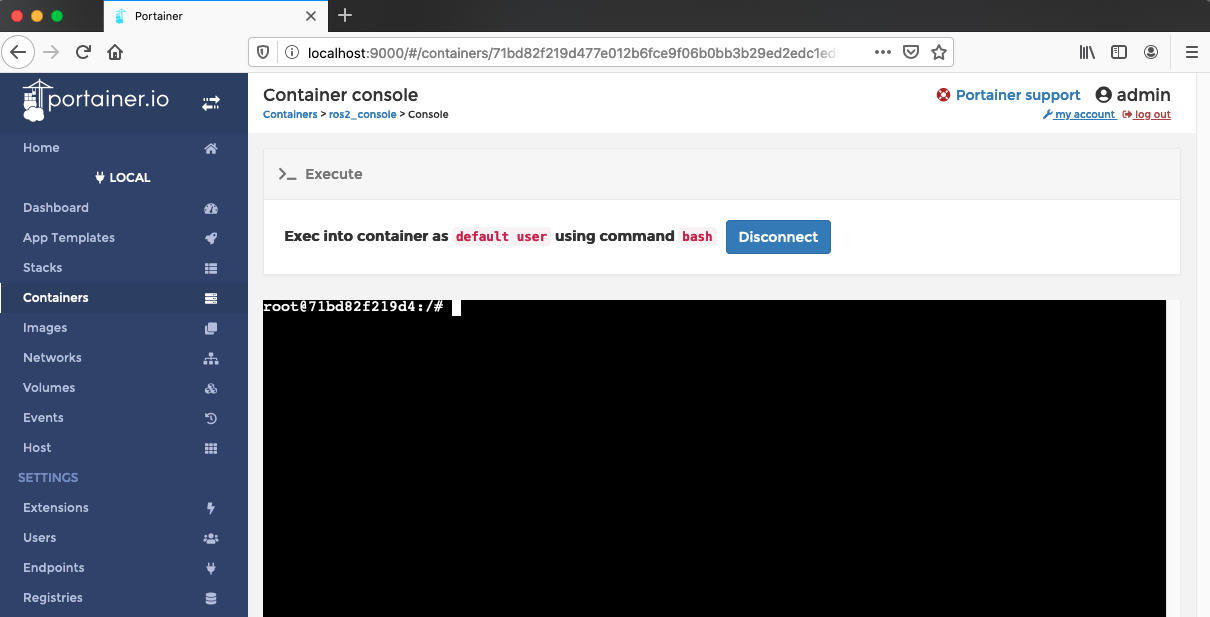
In the web-bash terminal, run our guided script and follow the simple instructions:
root@id:/# python3 /content/pt5/step_1.py
NOTE: run with python3!
3. How is wheel velocity computed and published out to ROS2?
By sampling the total number of ticks per wheel at certain time deltas, we can compute the current rotational velocity, in radians per second, of each wheel at any given time. Recall that each complete rotation is 2 * Pi, about 6.28, radians - ie for any circle, 6.28 radii equals the circumfrance of the circle.
So if a wheel is spinning at 6.28 radians per second, it is spinning about 1 full rotation per second. The general formula is:
wheel velocity = 2 * pi * (sampled-num-ticks-per-time-delta / total-num-ticks-for-the-entire-disk)
The units for each variable is:
wheel velocity - radians / second
pi - radians
sampled-num-ticks-per-time-delta - ticks / second
total-num-ticks-for-the-entire-disk - ticks
As you can see, by cancelling out the units in the equation, the rotational velocity is represented by radians per seconds.
The Hadabot's encoder disk has 40 ticks total. While there are only 20 "notches" in the disk, we count the edge transition of each notch as a tick.
The firmware is written in Python running in a MicroPython interpreter on the ESP32. As the wheels spin, the notch edge passes over the sensor which causes an interrupt routine to be serviced for the respective GPIO pin connected from the ESP32 to the sensor of the respective wheel. The interrupt routine simply increments the total number of ticks it has seen.
Every couple of milliseconds, the main firmware routine will sample the total encoder counts for each wheel, do the simple wheel velocity computation defined above and publishes the velocity in radians per second out to ROS2, via ros2-web-bridge, as a std_msgs/Float32 message over the /hadabot/wheel_radps_left or /hadabot/wheel_radps_right topics for each respective wheel.
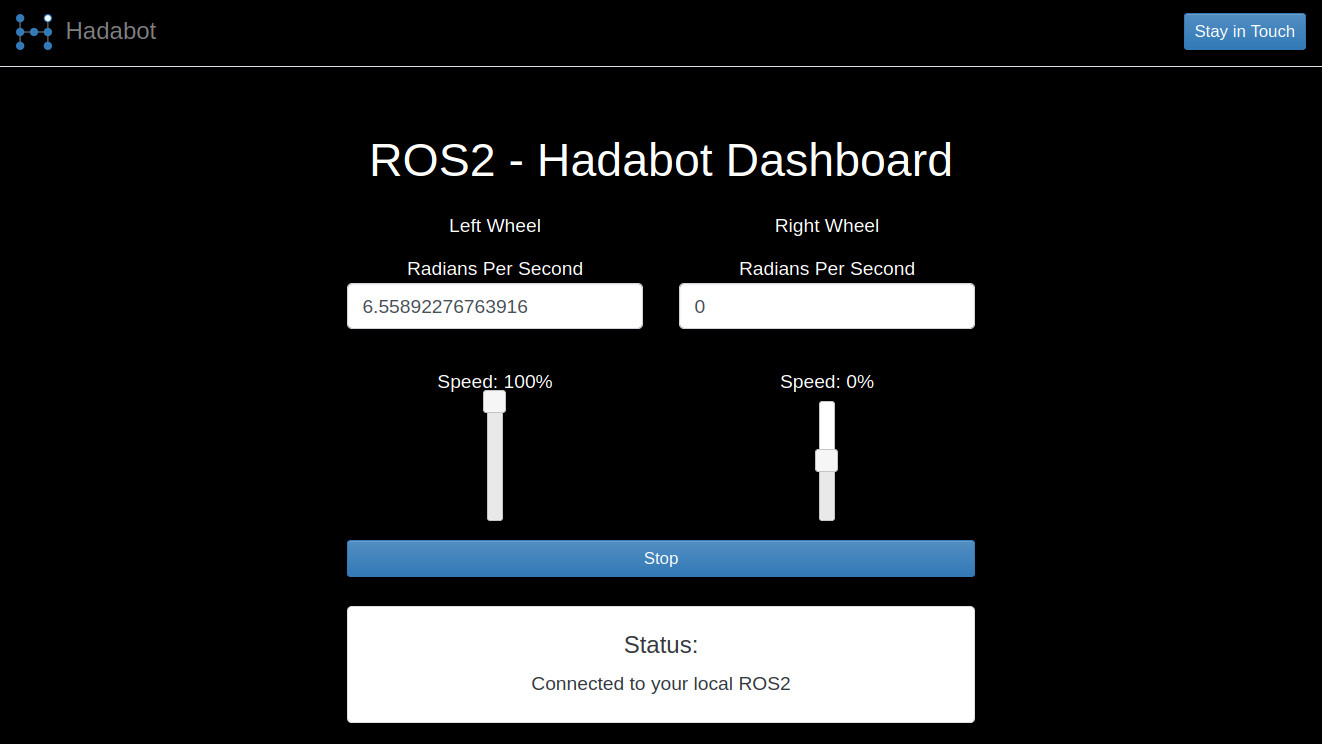
With our Hadabot web browser interface, you can spin each Hadabot wheel at different speeds. The Hadabot ESP32 starts publishing wheel rotational velocity out to ROS2. The published velocities are updated on the Hadabot web browser interface. You also ran a ROS2 command directly to see the published velocities.
4. Sets Hadabot up for odometry, then navigation
In order for a robot to navigate, it has to first know its pose. Our differential drive Hadabot's pose is its x, y location as well as its heading or orientation (ie where it's pointed) in relationship to the mapped environment its in. A aerial robot such as a drone will have many other variables defining its pose since it has more degrees of freedome than a differential drive robot. As a robot moves, obviously its pose changes. We use our knowledge of how fast the robot is moving and how fast it's changing its orientation to determine a robot's changing pose - ie a robot's odometry.
When we command a robot to go forward 1 meter per second for 2 seconds, rarely will the robot go exactly 2 meters forward. Wheels can slip. Motors need time to ramp up speed, as well as slow down to stop. With wheel encoders, we can get a better idea of exactly how much the wheels turned for any given move command. This is feedback in a control system - you command a system what to do and sensors feed back data on what was actually done so your next command can adjust accordingly based on your desired end goal.
Unfortunately, with each individual wheel's velocity, we have not completely solved for our Hadabot's odometry. While we know how fast each wheel is spinning, other than the trivially impossible case where each wheel spins exactly the same speed, we have not translated that into how fast the Hadabot is actually moving and changing its orientation as a whole unit.
In an upcoming post, we will code up a ROS2 node to use this wheel velocity information to compute the Hadabot's odometry. So stay tuned - sign up to stay in touch in the top nav bar!!
5. Conclusion
Congrats and thanks again for following along to learn ROS2 and robotics with Hadabot. We did / learned the following:
-
Learned how wheel encoders work and how encoders are wired up to a Hadabot.
-
Learned how wheel velocity is computed from the encoder sensor data.
-
Ran an example that publishes out the Hadabot's wheel rotational velocity over ROS2.
-
Used ROS2 commands to see the rotational velocities published.
-
Defined robot odometry, setting the stage to compute odometry in an upcoming post.
As usual, if you have suggestions, have comments, or just want to say hi, don't hesitate to reach out - hello AT hadabot DOT com.
I'll be posting updates about ounce a week. Keep updated on future Hadabot developments via the stay in touch button in the navbar above or footer below. Share Hadabot with other hackers and roboticists.
Thanks and happy building!
Jack "the Hadabot Maker"