Actively learn and master ROS2 and robotics by building and programming a Hadabot robot kit.
UPDATE March 28, 2020 - A new post about Hadabot has been published. The link is in the conclusion section below.
The new Hadabot kit is currently in development, set to release in the spring of 2020. It will primarily target Robot Operating System version 2 (aka ROS2, ROS 2) support. ROS2 is the next generation robot system with various improvements from the previous version 1 ROS.
The Hadabot robot kit strives to be economical and simple to setup for programming robotics concepts using ROS2. To ensure a consistent user experience across host development systems, the new Hadabot will primarily use the web browser for its user interfaces and leverage Docker containers to run ROS2 services.
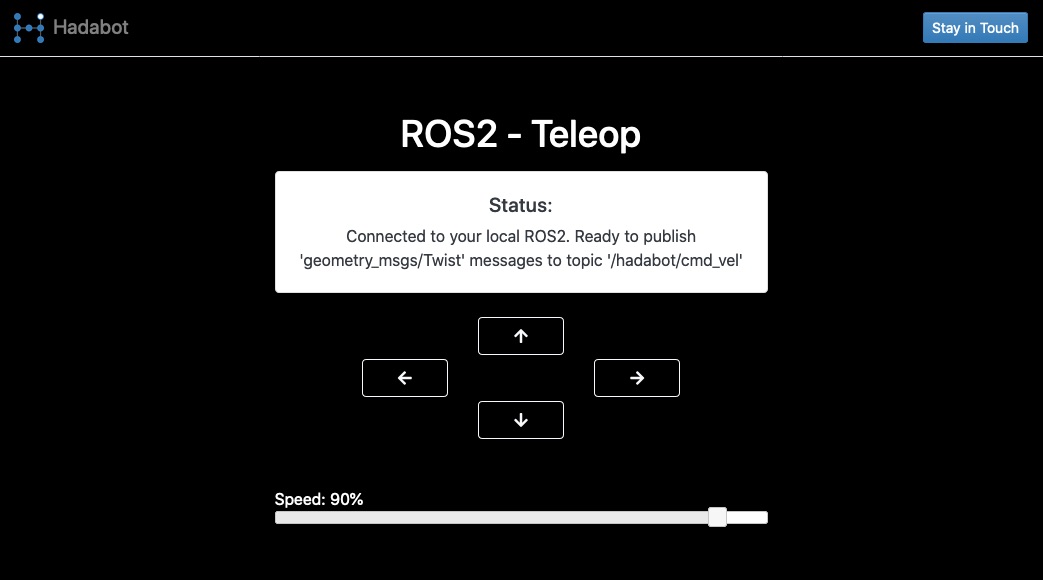
For those following along with the Hadabot progress, we started to run examples of interacting with ROS2 using a web interface, showcasing tools such as launching a web-based ROS2 teleop controller.
For the physical robot platform, we will be using Espressif ESP32 microcontroller to drive the electrical pins for motor / actuator control and read sensor data. I'll explain the rationale in a bit.
In this post, we'll set up and show an example of an ESP32 interacting with the Hadabot ROS2 system. Specifically, we'll:
-
Revisit the steps to start the Hadabot ROS2 software stack via Docker.
-
Install the Hadabot ESP32 firmware.
-
Show an example of the ESP32 wirelessly communicating with the rest of the Hadabot ROS2 system.
-
Explain the basic architecture of how the ESP32 communicates with ROS2.
-
Explain how this effort dovetails into the new Hadabot kit.
Reading this post and running the example should take no more than 20 minutes.
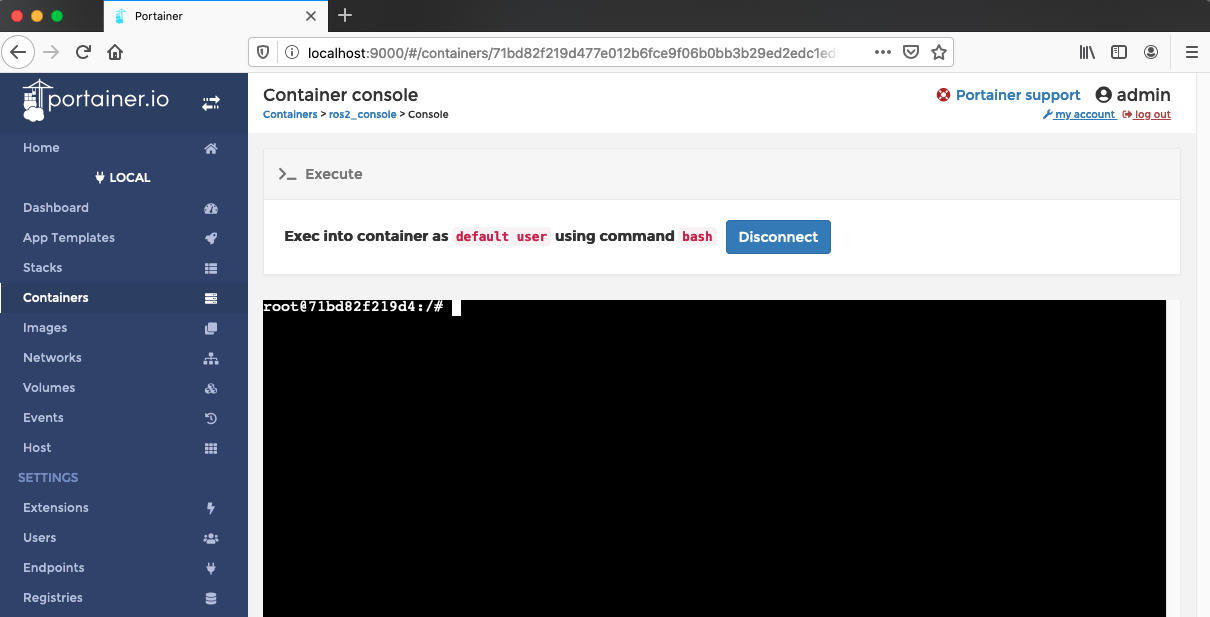
1. Start the Hadabot ROS2 software stack and web-bash terminal
Regardless if you are new to Hadabot or a returning hacker, follow step 2a to update your Hadabot Git repository, re-start the Hadabot Docker stack, and launch a web-bash terminal.
At the end of step 2a, you should have a web-bash terminal up like you see below. We'll be using the web-bash later.
2. Install the Hadabot ESP32 firmware
Of the many variants of ESP32 development boards, the one we use for the Hadabot is 50mm long x 28mm wide, has 30 pins, 2 buttons, a micro-USB connector and a CP2102 USB to UART chip.
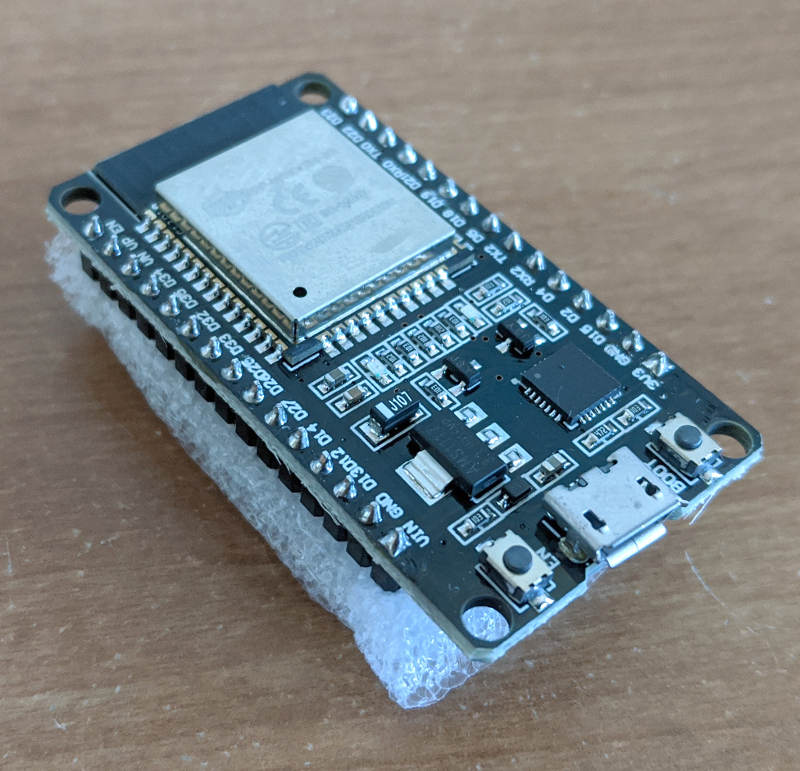
We'll talk more about the ESP32 in a bit. Let's install the firmware.
2a. Set up a couple of tools to flash the ESP32
Despite my strong desire to stick to web browser user interfaces, unfortunately, we need to install a couple of host-executed command-line Python tools to flash the initial ESP32 firmware. If you have ideas that suggest otherwise, please reach out - let's brainstorm together!
You will only need to be familiar with running Python and pip3 on your host computer. All the tools are Python 3.x compatible.
On your host development system:
$ pip3 install esptool adafruit-ampy
Esptool is used to flash the base firmware on to the ESP32.
Once we flash the base firmware, Adafruit-ampy (aka ampy) will be used to copy the remaining Hadabot firmware files over to the ESP32.
2b. Connect the ESP32 to your computer's USB
Connect the ESP32 to your computer's USB port. Note the USB device file for the ESP32 that appears in your filesystem (ie /dev/ttyUSB0 for Linux, /dev/tty.SLAB_USBtoUART for MacOS, etc).
If you do not see a USB device file emerge, you may need to install the CP210x driver for your host system, then restart your computer.
2c. Download and install MicroPython on to the ESP32
We will be using MicroPython as the base firmware for the Hadabot ESP32 microcontroller. We'll explain the rationale behind this decision in a bit. On your host machine:
-
Download the MicroPython binary which we will be flashing on to the ESP32.
-
Flash the downloaded MicroPython binary on to the ESP32. Run the following tools on your host development system:
$ esptool.py --port /dev/<the_esp32_usb_port> erase_flash
$ esptool.py --chip esp32 --port /dev/<the_esp32_usb_port> --baud 460800 write_flash -z 0x1000 /<path_to>/esp32-idf3-20191220-v1.12.bin
TROUBLESHOOT: If you get an error connecting to the ESP32 during the steps above, you may need to hold down the "BOOT" button on the ESP32 while you run the tool scripts. Once the script makes the connection, you can release the button.
2d. Update the Hadabot Git repo and upload the Hadabot firmware files
At this point you have already cloned or pulled the latest Hadabot Git repository from step 1 above. You should have:
- The Hadabot Docker stack up and running via docker-compose up -d.
- A web-bash terminal launched.
* Add network and ROS2 configurations for the ESP32.
The Hadabot repo, hadabot_main, has additional MicroPython firmware files for the ESP32. We will also need to create and modify a configuration file, hb.json, for your network and ROS2 settings. On your host system:
$ cd hadabot_main/firmware/uhadabot
$ cp hadabot_config_template.json hb.json
In the hb.json file, fill in the JSON fields:
- network
- ssid - your router's SSID
- password - your network's router
- ros2_web_bridge_ip_addr - the IP address of the computer running the Hadabot Docker stack via docker-compose up -d. This is likely your host development machine which you can run ifconfig to determine its IP address.
* Copy the Hadabot MicroPython firmware files over to the ESP32
Let's copy the remaining Hadabot files over to the ESP32 using the ampy tool. On your host machine:
$ cd hadabot_main/firmware
$ ampy --port /dev/<the_esp32_usb_port> put uhadabot
$ ampy --port /dev/<the_esp32_usb_port> put boot.py
IMPORTANT: you must FIRST run ampy --port XX put uhadabot, since boot.py will use files from the uhadabot folder.
* Reset the ESP32
Lastly, reset the board by pressing/releasing the "EN" button on the ESP32 development board.
The ESP32 board has 2 LEDs:
-
One for power which should be red. This power LED lights and stays lit once the ESP32 is powered.
-
The other LED is should be a blue on-board LED which we can control programmatically.
Once reset, the ESP32's blue on-board LED (aka "on-board LED" for the future of this post) should blink a couple of times as it connects to your network and then stay lit once it connects.
You are now free to disconnect the ESP32 from your host machine and to an external power source if you like.
3. Run an example of the ESP32 receiving and publishing ROS2 messages
As with all previous examples in past posts, we will run a Hadabot guided script from the web-bash terminal that's been idling in the background.
In the web-bash terminal, run our guided script and follow the simple instructions:
root@id:/# python3 /content/pt3/step_1.py
NOTE: run with python3!
4. How ESP32 communicates with ROS2
In the Hadabot Docker stack, we have a ros2-web-bridge running as a ROS2 node.
The ros2-web-bridge also runs as a websocket server for other non-ROS2 client connections - such as our browser-based teleop controller. The server implements a JSON-based API interface that wraps various ROS2 concepts such as subscribing to, publishing ROS2 messages over ROS2 topics. When connected clients make an API call, the ros2-web-bridge will act as a proxy and execute the actual ROS2 command on the client's behalf.
The Hadabot ESP32 firmware implements a websocket client that connects to the ros2-web-bridge. Once connected, even though the ESP32 is not a ROS2 node, the ESP32 can still subscribe and publish messages to various ROS2 topics using the JSON-based API interface to the ros2-web-bridge websocket server.
For the specific example you ran above, using the JSON-based API, the ESP32 subscribes to a ROS2 Twist message topic (which the web-based teleop controller happens to publish). When the ros2-web-bridge receives the ROS2 message on that topic (from the teleop controller), it forwards the message to the ESP32 over the websocket connection. Upon receiving the ROS2 message, the ESP32 is programmed to blink its LEDs.
In addition to subscribing to a ROS2 topic, the ESP32 is also programmed to publish out to a ROS2 String message topic. Every couple of seconds, the ESP32 will make a JSON-based API call to the ros2-web-bridge server to publish a heartbeat message. When the ros2-web-bridge receives this request, it will publish the actual ROS2 message on behalf of the ESP32.
5. Why use MicroPython on the Hadabot ESP32
MicroPython is an interpreter for a subset of Python 3.x that compiles down to a binary small and lightweight enough to run on an ESP32.
In addition to commonly used Python libraries, the ESP32-specific MicroPython binary also implements a number of low-level hardware libraries to set up the ESP32's WiFi, drive pin signals, interrupts, ADC, and much more.
With a Python 3.x interpreter running on the ESP32, we can use Python to implement a websocket client library as well as the JSON-based API interface to the ros2-web-bridge server - both of which are essential to connecting the ESP32 to the rest of the ROS2 system in a lightweight manner with minimal setup. These libraries all live in the hadabot_main/firware/uhadabot folder.
I won't say much more than this since the weeds of the implementation details have little to do with robotics or ROS2. But I'm always more than happy to answer questions you may have.
6. How Hadabot will leverage the ESP32 microcontroller
The new Hadabot will be a differential drive robot. The ESP32 is an capable microcontroller that has a number of key features at an economical price point. It's:
-
Powerful enough to run the MicroPython interpreter - making firmware easy to hack and test.
-
Has built-in WiFi.
-
Has a low power footprint.
-
Has a number of other key hardware features a Hadabot can leverage such as sleep-wakeup capabilities, bluetooth, capacitive touch, built in ADC, timers, etc..
The complex computations from planning, mapping, localizing, state estimation, and other robotics algorithms will execute in the Hadabot Docker containers on your more powerful host system. The low level commands to drive pins, turn wheels, read sensor data will be handled on the ESP32. Communication between the ESP32 and the containers will happen through the ros2-web-bridge server.
And we will make the UI web browser based as much as possible. Well - at least that's the plan!!
7. Conclusion
Congrats on getting a ESP32 set up to communicate to a ROS2 robotics system. If you followed and read along, you:
-
Flashed the necessary Hadabot firmware code on an ESP32.
-
Ran a couple of web-based examples to publish ROS2 messages to the ESP32 and subscribed to / echoed back ROS2 messages published out from the ESP32.
-
Learned how the ESP32 communicates with the ROS2 nodes running in the Hadabot Docker stack.
-
Learned the rationale behind using an ESP32 for the new Hadabot that will enable you to actively learn ROS2 and robotics as you build a Hadabot.
As usual, if you have suggestions - especially if you have other ideas on how to flash the ESP32 via a web browser - have comments, or just want to say hi, don't hesitate to reach out - hello AT hadabot DOT com.
I'll be posting updates 1 to 2 times a week. Keep updated on future Hadabot developments via the stay in touch button in the navbar above or footer below. Share Hadabot with other hackers and roboticists.
UPDATE March 28, 2020 - A new update - how to use ROS2, the ESP32 to drive a motor controller - has been published!
Thanks and happy building!
Jack "the Hadabot Maker"