Hadabot is a robot kit for those looking to actively learn ROS2 and robotics while building a robot.
A new Hadabot kit is currently in development. It will feature ROS2 support and emphasize a web browser-based user experience. Our goal is to create an economical kit that is easy to build and set up, allowing you to learn and hack ROS2 robotics with minimal frustration.
I've been posting the progress regularly. The main software stack uses Docker containers running locally on your host development system to ensure privacy and security. On your local system, you can launch a bash terminal in your web browser to interface with ROS2 (ie web-bash). We will also publish browser based GUI tools to interface with ROS2 and the Hadabot as well.
On the robot platform, we have an ESP32 microcontroller that communicates with ROS2 and the main software stack on your local host system.
For this post, we'll set up and run an example to show how we can use ROS2 to control a motor driver connected to the Hadabot's ESP32 microcontroller. Specifically, I'll:
-
Describe the current Hadabot robot platform.
-
Update the latest ESP32 firmware with the latest motor controller code.
-
Show a couple of examples to control the Hadabot's individual motors with ROS2 messages using a browser based GUI, as well as with explicit ROS2 commands.
-
Explain how ROS2 controls the Hadabot motors in the example.
-
Explain how this motor driver effort dovetails with future Hadabot developments.
Reading this post and running the example should take you 15-20 minutes.
1. Motor driver for the Hadabot differential drive robot
The Hadabot is a differential drive robot which has 2 motorized drive wheels. I chose a differential drive robot design for its simplicity. They are relatively easy to build while still being a fantastic platform for learning and implementing robotics concepts.
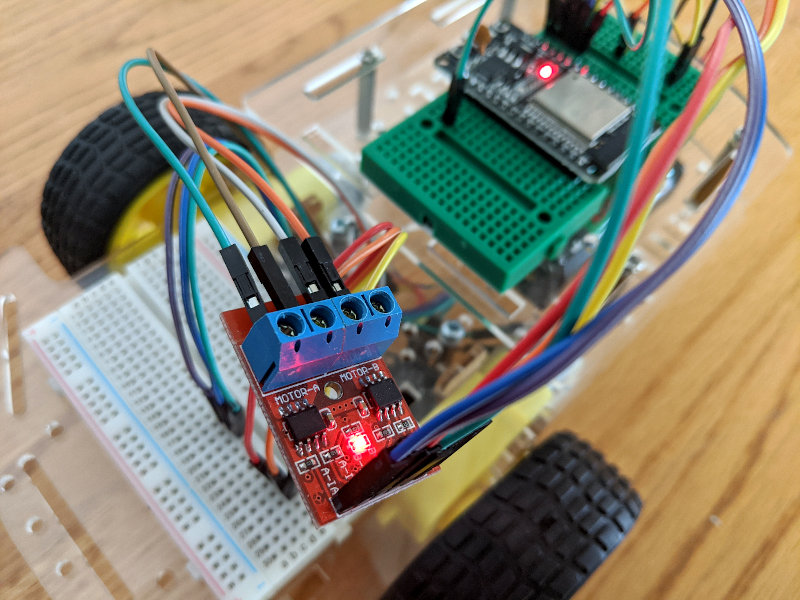
The Hadabot uses an ESP32 microcontroller wired up to a L9110 2-channel motor driver to control the 2 motorized wheels. The L9110 motor driver uses 2 control pins per wheel or channel. One pin controls the direction of the spin. The 2nd pin is driven with pulse width modulation (PWM) to control the speed at which the motor spins. As a 2-channel driver, the L9110 has 4 control pins total.
This is how I wired up the L9110 motor driver to the ESP32 and 2 motors.
| Channel | IA (PWM) L9110 Pin | IB (Motor Direction) L9110 Pin |
|---|---|---|
| Left Motor | ESP32 GPIO 12 | ESP32 GPIO 13 |
| Right Motor | ESP32 GPIO 14 | ESP32 GPIO 15 |
2. Update, start the Hadabot ROS2 software stack and web-bash terminal
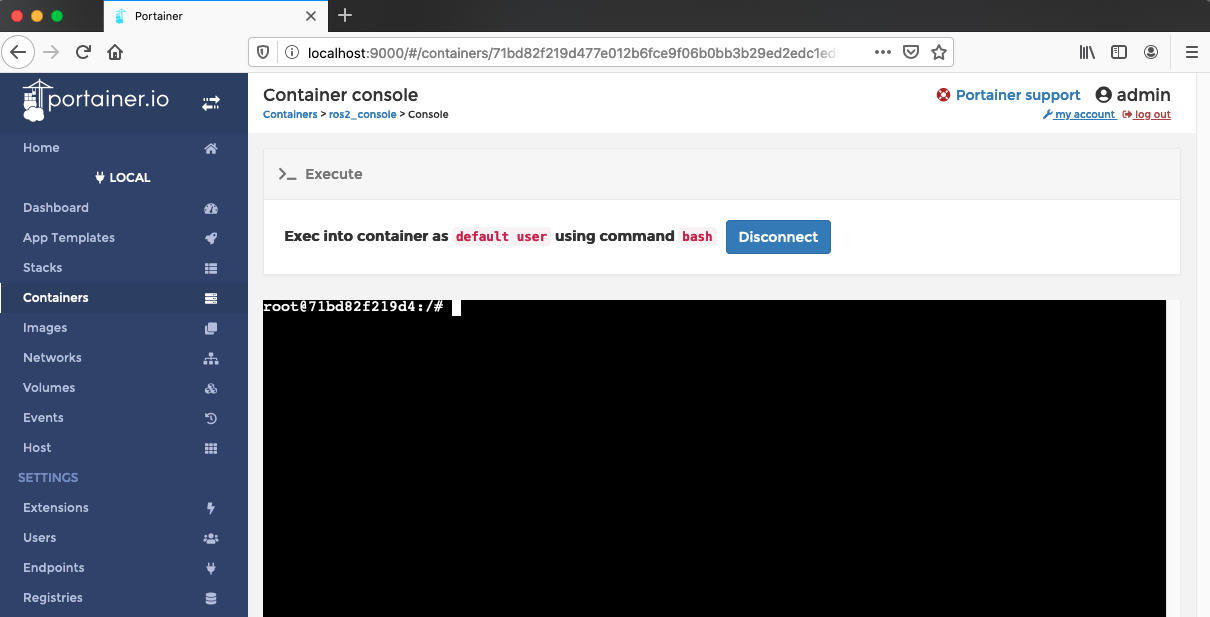
Regardless if you are new to Hadabot or a returning hacker, follow step 2a to update your Hadabot Git repository, re-start the Hadabot Docker stack, and launch a web-bash terminal.
At the end of step 2a, you should have a web-bash terminal up like you see below. We'll be using the web-bash later.
3. Update the Hadabot's ESP32 with the latest firmware
The Hadabot's ESP32 microcontroller is flashed with MicroPython allowing us to write firmware functionality in Python.
-- New to working with Hadabot? --
If you are new to Hadabot, you will need to follow step 2a thru 2d to install a couple of tools needed to flash your ESP32 board, download, update the firmware, reset the ESP32.
-- If you are a returning Hadabot hacker --
Make sure all the WiFi and IP configurations are still relevant in your hadabot_main/firmware/uhadabot/hb.json config file. If your host development system's IP address changed, you must update the change in the hadabot_main/firmware/uhadabot/hb.json config files.
$ cd hadabot_main/firmware
$ cat uhadabot/hb.json
... to confirm the various settings.
Next, plug in your ESP32 to your computer.
While still in hadabot_main/firmware, run the clean_firmware.py script on your ESP32 using ampy.
$ ampy --port /dev/<the_esp32_usb_port> run clean_firmware.py
Once the ESP32 resets, the ESP32's blue on-board LED (aka "on-board LED" for the future of this post) should blink a couple of times as it connects to your network and then stay lit once it connects.
You are now free to disconnect the ESP32 from your host machine and to an external power source if you like.
4. Example to spin the ESP32 wheels
As with all previous examples in past posts, we will run a Hadabot guided script from the web-bash terminal that's been idling in the background.
In the web-bash terminal, run our guided script and follow the simple instructions:
root@id:/# python3 /content/pt4/step_1.py
NOTE: run with python3!
5. How we use ROS2 to spin the motors
The ESP32 microcontroller is connected as a websocket client to our ros2-web-bridge websocket server. The ESP32 tells the ros2-web-bridge to subscribe to two ROS2 topics:
- /hadabot/wheel_power_left topic
- /hadabot/wheel_power_right topic
The ros2-web-bridge which also runs as a ROS2 node, subscribes to those topics on behalf of the ESP32. When the ros2-web-bridge receives a ROS2 std_msgs/msgs/Float32 message on either of the 2 topics, it forwards the Float32 message to the ESP32 over the websocket connection.
The Float32 messages have values between 1.0 to -1.0, representing full power forward to full power backward. Depending on which value is received, the ESP32 turns the respective wheel with the desired intensity as a Pulse Width signal to the motor driver.
The firmware is written in Python3 and runs on the ESP32's MicroPython interpreter. I won't describe the actual firmware code that drives the pins, which lives in the uhadabot folder, since the code has more to do with microcontroller programming than ROS2 or robotics.
In the example, you used 2 different methods of publishing a Float32 message over either the /hadabot/wheel_power_left or the /hadabot/wheel_power_right topics.
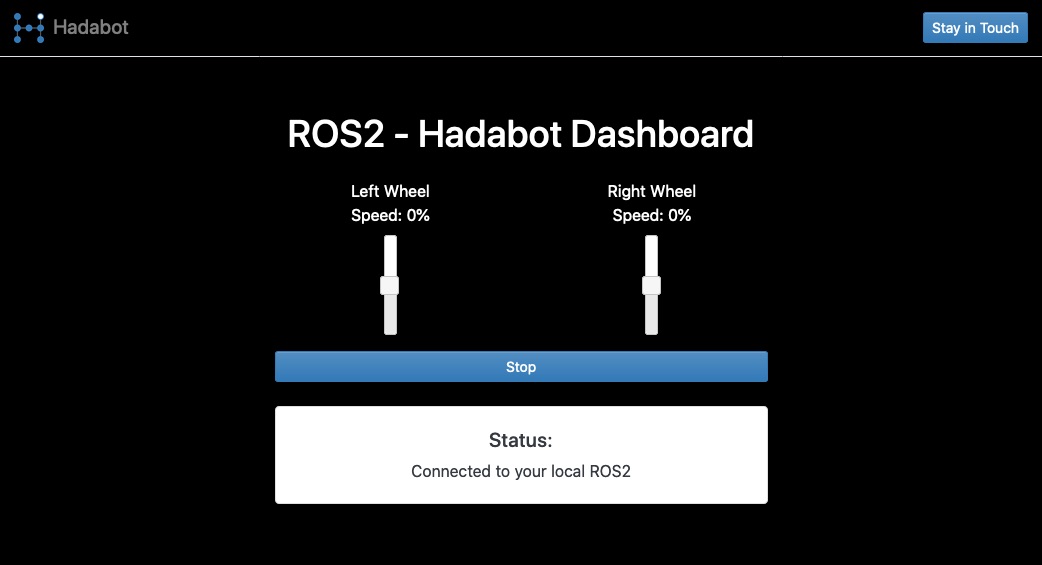
In the first method, you used our Hadabot browser based GUI. As you manipulated the slider bar, a Float32 value between 1.0 and -1.0 is published over ROS2 depending on the position of the slider. The "STOP" button publishes a 0.0 on both topics stopping both wheels.
In the second method, you used a ros2 command - specifically the ros2 topic pub ... command - to publish out a Float32 value. The arguments for the command should be pretty obvious. The -1 or --once flag is used to publish the message once and quit. To see all the command options, you can type ros2 topic pub --help.
6. Our Hadabot can turn its wheels - now what?
At the lowest level (ie at the ESP32 microcontroller level), we need a way to specify the power to each motor on the Hadabot. But at a high level, it is awkward to drive a differential robot (or any wheeled vehicle) by explicitly setting a left and right wheel power level. Intuitively, we want to command the robot to go forward, backward, turn left or right - like what we did with the teleop controller that publishes Twist ROS2 messages.
As the Hadabot platform matures, I'll introduce code to convert Twist messages into the individual Float32 wheel power messages for each wheel - a robotics discipline known as kinematics.
Additionally, the high-level Twist message commands should not be in units of "power levels". We want to specify velocity as some unit over time - ie meters per second and radians per second. By specifying velocity (instead of power level), we can track where the Hadabot goes as well as specify where it should go in the future and how - in robotics-speak this would be state, pose estimation, localization, and motion planning.
There are other developments that need to occur before either of the robotics concepts above are introduced. More reason to stay in touch!!
Conclusion
Congrats on completing another Hadabot example. If you followed along, you did the following:
-
Updated the Hadabot ESP32 firmware with the code to control a L9110 motor driver.
-
Learned to use the ros2 topic ... command and our Hadabot web interface to turn the Hadabot differential drive wheels.
-
Learned how this functionality works and how it will be used to learn robotics control, kinematics, pose estimation and localization in the future.
As usual, if you have suggestions, have comments, or just want to say hi, don't hesitate to reach out - hello AT hadabot DOT com.
I'll be posting updates 1 to 2 times a week. Keep updated on future Hadabot developments via the stay in touch button in the navbar above or footer below. Share Hadabot with other hackers and roboticists.
Thanks and happy building!
Jack "the Hadabot Maker"