Hadabot is a robot kit for software engineers to learn ROS2 and robotics.
We are a week or so away from a beta release of the Hadabot kit. We'll disclose more info on how to sign up for one at the end of this post.
The new Hadabot kit fully supports ROS2. In addition to the hardware kit, the Hadabot software environment will be primarily web browser based which minimizes cross-platform differences in user experience. To drastically reduce user frustration from set up and library management, we use Docker to create the ROS2 systems as a stack of Docker containers easily launched from a single command. Docker will also help us sandbox all the ROS2 libraries from your host system and make your Hadabot be portable from host system to host system.
In this post, we'll start our dive into the concept of robot navigation by implementing and learning about robot odometry for our Hadabot, which is a differential drive robot. We'll be programming odometry as a ROS2 component (ie ROS2 node) using Visual Studio Code (VSCode) running in a web browser.
Since the entire ROS2 system, Hadabot modules, and even VSCode runs inside the Hadabot's Docker container stack, you won't need to set up or install VSCode or ROS2. Simply kick off the Docker stack and start hacking!
You will need to know some C++ but you won't need a physical Hadabot kit to follow along with this post. Specifically we'll:
-
Learn about differential drive robot odometry.
-
Learn how ROS and ROS2 handles odometric data.
-
Set up a Hadabot browser-based VSCode.
-
Compile and debug a ROS2 C++ odometry node using our browser-based VSCode.
-
Understand ROS2 project (ie workspace) structure and about ROS bag data files.
-
Walk through the odometry C++ code together.
In addition to sample code that implements odometry, we will also provide a half-implemented variation for you to try to implement the odometry code yourself.
It should take 30 to 45 minutes to follow along with the examples and read this post.
1. Differential Drive Robot Odometry
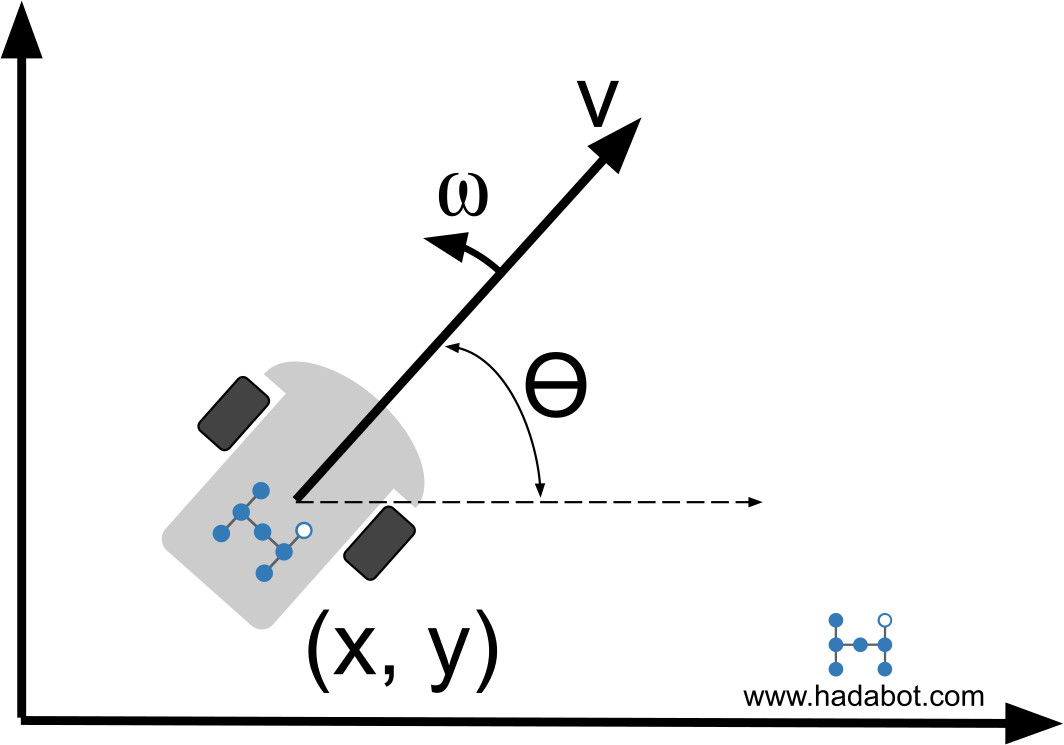
Robot odometry is the process of estimating our robot's state and pose. For a differential drive robot like our Hadabot, we use the knowledge of how the wheels are turning to estimate the Hadabot's motion and pose - more on why it is an estimate later.
Motion entails how fast our Hadabot is moving forward, ie velocity, (we'll be using meters per second) as well as how fast our Hadabot is turning (in radians per second) - represented by the pair \((v, \omega)\).
ROS2 uses a right handed coordinate system. It's fairly common to only consider a wheeled-robot in 2D space where a drawn x-axis points right, y-axis points up, and the (generally unused) z-axis points toward our face. Therefore, a positive rotation means turning counter-clockwise when looking at our Hadabot from the top down, ie down the z-axis.
Pose is the \((x, y)\) 2D location of our Hadabot as well as the (ie the heading angle) represented by \(\theta\) in some coordinate space.
When a robot first powers up, it's fairly common to consider its initial pose to be \((x_0, y_0) = (0, 0)\) and \(\theta_0 = 0\). The robot points to the right at the origin of some coordinate map.
For our differential drive Hadabot, odometry becomes an exercise in estimating \((v, \omega)\), \((x, y)\), and \(\theta\) from our measurement of how fast each wheel is rotating.
We measure how the Hadabot's wheel rotational velocity (radians per second) with its wheel encoder sensors. After physically measuring the wheels' radius (in meters per radian) with a ruler, we can easily compute the distance velocity per wheel (meters per second) - \(v_{left}\) and \(v_{right}\) - with simple math.
In continuous time, odometry becomes an integration process which can be quite nasty. But fortunately for us, we can sample in small discrete time chunks, ie \(\Delta t\), which makes the math much simpler. I'm not terribly good with differential equations but I'm great at summing up numbers!
Once you have \(v_{left}\) and \(v_{right}\) you can compute how far the each wheel has traveled (in meters):
The odometry exercise becomes using these inputs:
- \(d_{left}\), \(d_{right}\)
- The robot's previous \((x, y)\) location and \(\theta\) orientation
... to compute these outputs:
- New linear and angular velocities \((v', \omega')\)
- New pose \((x', y')\) and \(\theta'\)
We'll liberally skip some derivations, but the most important intermediary computations are:
What is \(d_{wheelbase}\)?
It is the measured distance between the center of the left and right wheels, in meters. With the picture below - \(d_{wheelbase} = r_{right} - r_{left}\). But pragmatically, you can measure this with a physical Hadabot using a ruler.
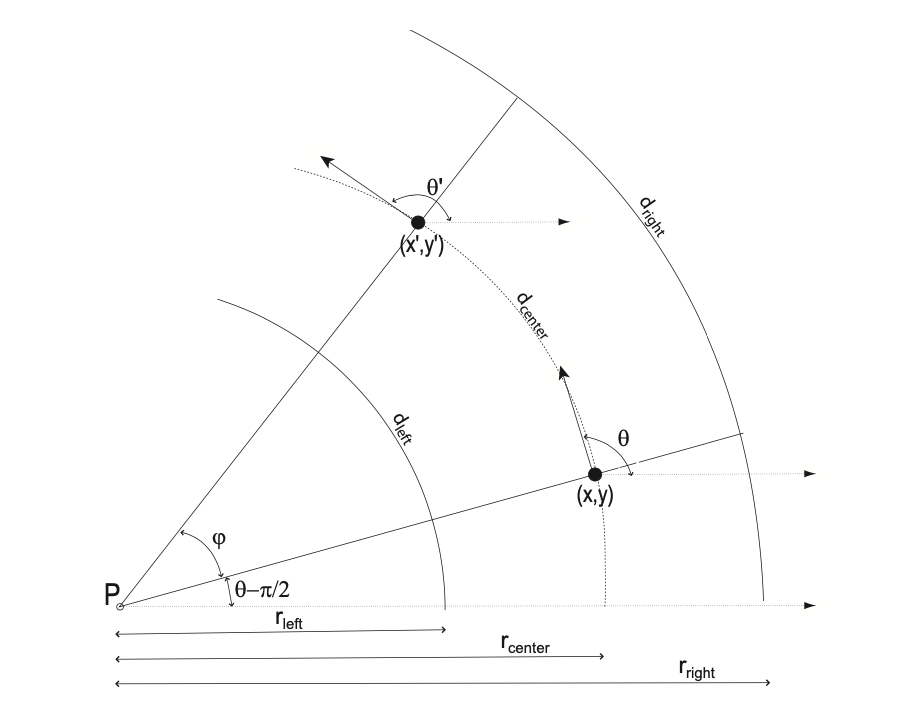
What is \(d_{center}\)?
If both left and right wheels spin at the same rate, the Hadabot trivially moves along in a straight line. But if one wheel happens to spin faster than another, the path of each wheel becomes an arc around some center of rotation \(P\) in our coordinate map. The distance of each of the arcs are \(d_{left}\) and \(d_{right}\) respectively for each wheel. And \(d_{center}\) is the length of the arc path between the wheels.
What is \(\phi\)?
We know the previous orientation of the Hadabot is \(\theta\) on in our coordinate map. We're trying to compute the new orientation \(\theta'\). Intuitively, \(\phi = \theta' - \theta\) - the difference between the new and previous orientations. Mathematically, you can compute \(\phi\) with the derived equation above.
The derivations for the equations above are clearly described in this paper on differential drive odometry. The derivations are straight forward and rely on figuring out the center of rotation, \(P\), and using some basic trigonometry to derive the rest.
With the intermediate computations and our current state, specifically \(\phi\), \(d_{center}\), \((x, y, \theta)\), we can compute the new pose, \((x', y', \theta')\), of our robot with the following equations:
The new linear and angular velocities for our Hadabot are:
2. Odometry on ROS, ROS2
Upon computing the new pose and velocities for the Hadabot, we will be publishing these new estimates out to the ROS system using a nav_msgs/msg/Odometry message.
In the Odometry message, there are 4 main fields - header, child_frame_id, pose, and twist.
We will publish the new velocity estimates in the twist field, and the new pose estimates in the pose field:
- odometry.twist.twist.linear.x = \(v'\)
- odometry.twist.twist.angular.z = \(\omega'\)
- odometry.pose.pose.position.x = \(x'\)
- odometry.pose.pose.position.y = \(y'\)
- odometry.pose.pose.orientation = quaternion_from_roll_pitch_yaw(0, 0, \(\omega'\))
Since the Hadabot differential drive robot operates on a 2D planar map space with 3 degrees of freedom - move along x, along y, and rotate along z (ie yaw rotation) - a number of fields for a complete 3D map, 6 degrees of freedom are ignore. For the yaw orientation \(\omega'\), ROS represents angular orientations as quaternions. So before we store away the orientation, we need to convert the yaw orientation angle \(\omega'\), along with zero roll and pitch angles, into a quaternion.
Additionally, there are a number of other fields in the Odometry message which we did ignored - header, child_frame_id, and the covariance sub-fields in pose and twist.
-
The header field has time stamp data for this message, and a map frame field to specify how which coordinate map frame the pose data is for - ie is the \((x, y)\) coordinate on the earth, on a local region map, etc?
-
The child_frame_id, similar to the header.frame_id field, relates the twist, ie velocity, data to a map frame.
-
The covariance fields represent our uncertainty of the respective twist and pose measurements. Remember, we said that our odometry are only estimates. This is because wheels can slip, the encoder sensors has noise and is inaccurate, and there may also be sampling error (while the robot moves continuously, we are only sampling at a \(\Delta t\) rate). All these contribute to errors which should be represented in some manner in the covariance fields.
For this current odometry example, we can safely ignore timestamp, frame_id's, and covariance for the sake of simplicity. But in order to perform robot navigation robustly, we will need them and will definitely touch upon them in future posts.
3. Compile, run an odometry ROS2 node using VSCode on your browser
Many of you may have heard of an IDE called Visual Studio Code (VSCode). Hadabot will use VSCode extensively to guide, compile, and showcase various pieces of ROS2 code and robotics concepts we implement together.
Our VSCode will run as a local Docker container inside your Hadabot Docker stack. Additionally, we will use VSCode from the web browser for a consistent user experience independent of your host system OS.
In addition to editing code, VSCode also enables an integrated browser-based interface to:
- The file system
- A bash terminal - which we'll occassionally refer to as web-bash
- View rendered markdowns for reading guided instructions
NOTE: For those who have followed along past posts, the Hadabot web-bash was launched from a Portainer container in the Hadabot Docker stack. Since VSCode also provides web-bash capabilities with a simpler interface, we obviate the need for Portainer and have removed it entirely from the stack.
3.1 Set up the Hadabot online development environment
Before we run the example, we need to follow step 2a to update your Hadabot Git repository, re-start the Hadabot Docker stack.
3.2 Compile and run the debugger through the odometry ROS2 node
Follow these steps:
-
Launch the browser-based VSCode workspace specific to this post (this link points to your localhost so everything is running securely on your local system).
-
In the VSCode Explorer panel, right-click the README.md file -> Open Preview.
-
Follow the instructions in the README to compile, run, and debug the ROS2 odometry code.
4. How the source code is structured - ROS2 workspaces, packages, and nodes
ROS2 uses the concept of workspaces and packages to organize the various architectural modules that implements a robot system. A workspace consists of a set of packages. A package usually implements a functional module, such as navigation or robot control, so it consists of source code to implement the ROS nodes that can be launched as executables.
We won't go into detail about how to create ROS2 workspaces or packages since there are tutorials online on how to create a ROS2 workspace as well as a how to create a ROS2 package within a workspace.
To streamline this post, we pre-created a hadabot_ws ROS2 workspace. In it, we created a ROS2 package, hadabot_driver, which has one source file hadabot_odom.cpp (well 2 source files - hadabot_odom_diy.cpp which we'll ignore for now and explain its use later).
ROS2 uses a tool called colcon to build the ROS2 packages in a workspace.
The colcon tool builds the source files from our hadabot_driver package to create a hadabot_odom ROS2 node.
Once we source our ROS2 hadabot_ws/install/setup.bash environment, we can launch that hadabot_odom ROS2 node from anywhere with the command ros2 run ros2 run hadabot_driver hadabot_hadabot_odom. By sourcing the setup.bash, we set up our terminal environment to find the ros2 tool as well as be able to auto-magically tab-complete the package and node names from the package.
5. What are ROS bags?
ROS2 has a concept call "bags" which is a directory structure of pre-saved ROS messages.
In our example, we have a folder called rosbag2_wheel_rotational_velocity_data which holds a large number of ROS2 messages we pre-saved from a running Hadabot robot. As the Hadabot's wheels turned, it published out its wheel rotational velocity measurements over the /hadabot/wheel_radps_right and /hadabot/wheel_radps_left ROS2 topics which we saved into rosbag2_data.
To play (as well as save) messages, we invoke the ros2 bag
By playing back saved bag data, we can test our odometry node without requiring a physical Hadabot to be present.
6. How we implement odometry in ROS2
The odometry code lives in the hadabot_ws_/src/hadabot_driver/src/hadabot_odom.cpp file. As explained in this simple ROS2 C++ node tutorial, the cpp file includes some necessary ROS2 libraries and defines a main(...) function.
At a high level, the following happens:
-
We create 2 subscribers, radps_left_sub_ and radps_right_sub__, to capture the wheel rotational velocity messages and save away the current rotational velocities for the respective wheels.
-
We create a timer that triggers a callback, publish_odometry(...)_, every so often to publish out the current odometry.
-
We create a timer that triggers a callback, update_odometry(...), more frequently to update the current odometry given the latest rotational velocities of each Hadabot wheel.
The update_odometry(...) function is where we implement the odometry equations previously described above. The results from the calculations are stored in the pose_ variable.
We separate the update from the publishing of the odometry since we may want to update our odometry faster than we publish. This allows us to decrease \(\Delta t\) without flooding our ROS2 system with odometry messages.
6.1 Use the VSCode debugger to step through the ROS2 C++ code
The finer details of the implementation can be better understood by stepping through the code with the built-in GDB debugger. All the easy-to-follow-along instructions on how to kick off the debugger are described by the README markdown you opened previously in the browser-based VSCode environment.
6.2 Try to implement odometry on your own
You may have also noticed another C++ source file called hadabot_odom_diy.cpp in the hadabot_driver_ package. This file is nearly identical to the _hadabot_odom.cpp file except it has only scaffold code for the update_odometry(...) function definition.
Doing is better than reading, so we welcome you to implement the odometry equations yourself by fleshing out the update_odometry(...) function definition and comparing your results with ours. Perhaps we have a bug in our code. =)
7. Conclusion
Thanks for following along this post on robot odometry. We did the following:
-
Learned how to compute odometry for a differential drive robot like the Hadabot.
-
Ran an example to compile a ROS2 node that computes odometry.
-
Used our browser-based VSCode environment to run a debugger again the ROS2 node you compiled against ROS2 bag data.
We'll continue along the robot navigation thread in future posts.
As for Hadabot progress - we have the parts for beta Hadabot kits in stock!! Please sign up to stay in touch to indicate your interest in early access to our kits. As we finalize the details, we will have a definitive cost, but it will be around $100 to $120.
As usual, if you have suggestions, have comments, or just want to say hi, don't hesitate to reach out - hello AT hadabot DOT com.
Please share Hadabot with other software engineer hackers and roboticists.
Thanks and happy building!
Jack "the Hadabot Maker"