Hadabot is a robot kit for software engineers to learn ROS2 and robotics in a hands-on manner. Our robot kits are easy to build, extensible, and more importantly, low-cost and affordable. The Hadabot software stack consists of an open source web browser-based coding environment to make the hacking experience frustration-free.
Hadabot ROS2 "Turtle" robot kits are available for purchase!
In order for a robot to autonomously navigate, it needs to know where it is in its environment. For a differential drive robot such as the Hadabot Turtle which navigates in a 2-dimensional planar environment, the robot's pose in the environment consists of its 2D \((x, y)\) location and its angular \(\theta\) orientation (ie what direction the robot is pointed in).
For a differential drive robot implemented using ROS 2 (or even ROS 1), the ROS 2 Navigation package is arguably the most widely-used, feature-rich open-source package for 2D robot navigation.
In this post, we'll introduce you to the ROS 2 Navigation package, aka Navigation2. Navigation2 requires the use of another ROS 2 package called tf2. Instead of using a Hadabot Turtle robot, we'll be using the simple ROS 2 turtlesim simulator so everyone can follow along without the need for a physical robot. We'll be doing the following:
-
Run a simple go-to-goal Navigation2 tf2 turtlesim example.
-
We run the example using our turn-key Hadabot browser-based VSCode and browser-based VNC development environment.
-
We will visualize the example using a ROS GUI tool called rviz.
-
-
Introduce you to the ROS 2 packages used:
-
The turtlesim package.
-
The tf2 package.
-
The Navigation2 package.
-
-
Explain how the example and parts of the ROS 2 code works.
As with past posts, we will also provide a half-implemented variation for you to try to implement the main pieces of the code yourself.
It should take 30 to 45 minutes to read and follow along with the examples.
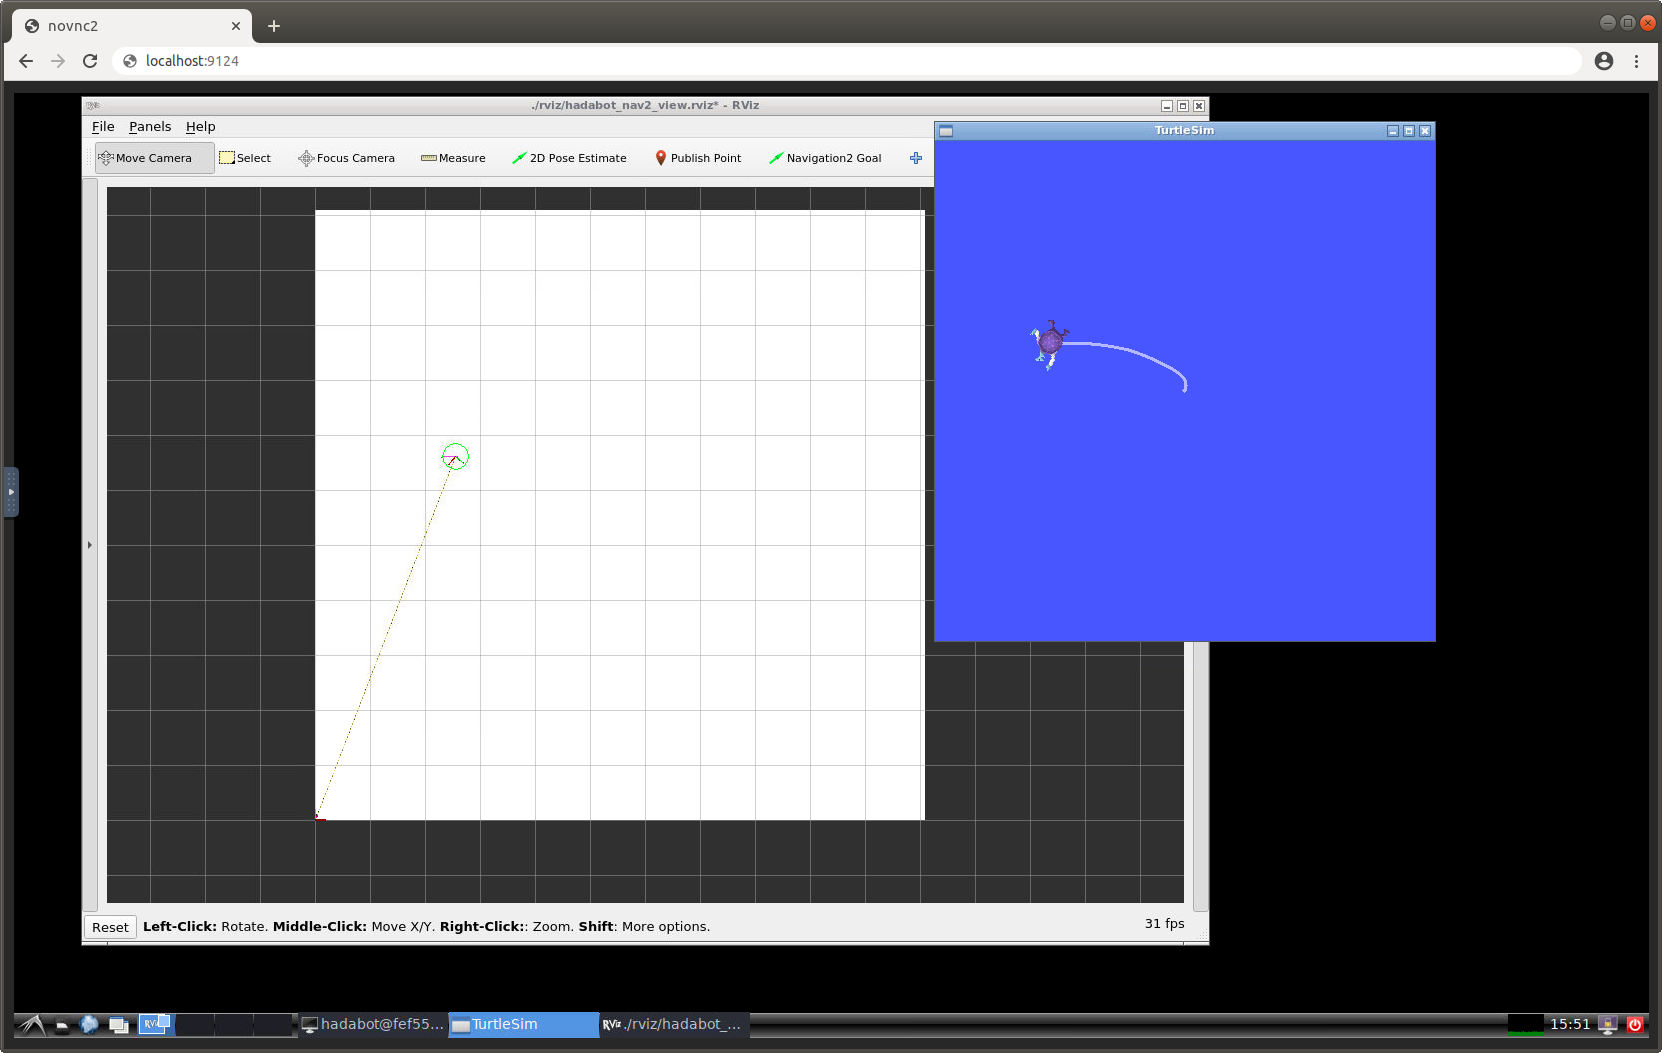
1. Run the ROS 2 go-to-goal Navigation2 tf2 turtlesim example
We'll be using the browser-based VSCode environment and a browser-based VNC to run our example code.
Follow these steps:
-
Set up / update your turn-key Hadabot software stack (which leverages Docker containers to ensure your code runs securely and efficiently on your local machine):
-
If you are new to Hadabot, follow these steps to set up Docker and get the Hadabot software stack up and running (5 to 15 minutes).
-
Else if you are a returning Hadabot hacker, follow these steps to update your Hadabot software stack (1-3 minutes).
-
-
Launch the browser-based VSCode workspace specific to this post (this link points to your localhost so everything is running securely on your local system).
-
In the left VSCode Explorer panel, right-click the README.md file -> Open Preview.
-
Follow the instructions in the README to:
-
Compile the Navigation2 tf2 turtlesim example.
-
Launch a browser-based VNC client to run the example.
-
Run a simple go-to-goal Navigation2 tf2 turtlesim example.
-
2. The ROS 2 launch file to orchestrate robot bringup
Generally, a ROS based robot will require the configuring and executing of a large number of ROS nodes from various ROS packages. However, to kick off our example, we only had to execute a single ros2 launch hadabot_nav2_launch.py command. The hadabot_nav2_launch.py file is a glorified python script that uses various ROS python launch libraries to orchestrate the configuration and execution of all the ROS components that our example uses. Mostly all ROS robot systems are launched (ie bringup) using these ROS launch files. By using a single launch file, you avoid having to individually set up and execute each and every ROS nodes one-by-one which can be an intractable exercise.
In the hadabot_nav2_launch.py file, you will find a number of ROS launch library calls which set up the various configuration settings for Navigation2, rviz, turtlesim, as well as the Hadabot specific ROS node. This hadabot_nav2_launch.py launch file also calls other launch files - such as the rviz_launch.py to kick off rviz, and the bringup_launch.py to kick off Navigation2. So launch files can call other launch files to further modularize the configurating of ROS components.
It is worth jumping to the bottom of hadabot_nav2_launch.py to note the last couple of add_action(...) calls to kick off the 4 main ROS components that our example uses - rviz, Navigation2, turtlesim, and Hadabot component. To limit the scope of this post, we won't dive into the specifics of each setting or launch specific call. But we will do so some time in a future post.
3. Turtlesim
The turtlesim is the helloworld ROS 2 robot example used by a ROS newbie to familiarize themselves with the ROS system. Fun fact for those old enough to remember (that includes me!) - the turtle is inpsired by the turtle from the Logo programming language.
3.1 Moving turtlesim with the ROS Twist message
Similar to how we control the Hadabot Turtle robot's movement, the turtlesim robot is also controlled by ROS geometry_msgs/msg/Twist messages. As a matter of fact, after you kick off the launch file in your web-based VNC window, from your web-based VSCode, you can try the following in a terminal:
(From your web-based VSCode window: Left-click the upper-left '3 bar menu icon' -> Terminal -> New Terminal):
$ source /opt/ros/foxy/setup.bash
$ ros2 topic pub -1 /cmd_vel geometry_msgs/msg/Twist '{linear: {x: 1.0, y: 0.0, z: 0.0}, angular: {x: 0.0, y: 0.0, z: 0.0}}'
You just published a ROS message to drive the turtlesim forward. You should see the effect in the browser-based VNC window.
3.2 Getting turtlesim's pose with the Odom message
Also similar to how the Hadabot Turtle publishes its pose, the turtlesim tells the world about its pose by publishing out ROS messages.
Again for a show-and-tell, you can try the following in a terminal:
$ ros2 topic echo /turtlesim1/turtle1/pose
(Ctrl-C - to quit)
Turtlesim publishes its position \((x, y)\) and angular rotation \(\theta\) of the turtlesim in relationship to the lower-left corner of its squarish world. The ROS message also includes its current velocities (which should all be zero if your turtlesim is not moving).
3.3 God-like knowledge of turtlesim's pose
For a physical robot, because of the inaccuracies of real sensor readings, slippage of the wheels, slight imperfections in the wheels itself, we cannot know its exact pose.
But because turtlesim's a simulation, we actually do know its pose with God-like precision. For the purpose of this post, having the ability to know precisely where turtlesim is will simplify the example considerably.
4. What is rviz?
Rviz is a swiss army knife GUI tool to visualize what your ROS robot is doing, where the robot is in its environment, along with many many other features not used by this example.
For our example, we use the rviz tool in 2 ways:
-
To visualize where the turtlesim is in its robot world.
-
To help us specify a Navigation2 goal pose using a GUI, versus having to tediously type the goal pose as an extremely long terminal command.
5. What is the ROS 2 Navigation2 package?
Navigation2 implements a number of algorithms that enables a wheeled robot to safely navigate from one location to another, as specified by its end goal and/or programmed purpose. Navigation2 embraces 3 functional responsibilities for robot navigation:
-
Planning - Given a goal, how to safely navigate the robot to that goal. What path or trajectory does the robot undertake? How fast or slow to move?
-
Localization - Given sensor data and odometry information, where is the robot in its environment?
-
Mapping or SLAM (Simultaneous localization and mapping) - While localizing itself, also draw a map of the robot's environment.
Mostly all of the Navigation2 algorithms are implemented in a probabilistic manner - instead of stating that the robot is specifically at a particular location, we always state that the robot is around this location with X% of confidence. With a probabilistic approach, we can better deal with uncertainties caused by noisy sensor data, physical robot imperfections, and real-world physics that cannot be directly measured or modeled.
For this example, we used the go-to-goal feature from Navigation2 that only employs planning and localization. We specify the final goal pose - a\((x, y)\) position and \(\theta\) orientation - for the turtlesim using the rviz GUI. Navigation2 then proceeds to plan out a trajectory path towards the final goal pose and publishes out sequences of Twist messages to turtlesim to direct its movement.
3. What is the tf2 package? Why do we need it in ROS, robotics?
To position yourself, you need to also specify a frame of refence that corresponds with the position. For example, I am 2 meters right and 1 meter forward, facing forward from the back-left corner of my living room. The back-left corner of your living room is the parent reference coordinate frame for the 2 meters right, 1 meter forward position you specified.
You also need to specific about the orientation. The positive x-axis points to towards the back-right corner, positive y-axis points toward the front-left corner. My position is \((x, y) = (2, 1)\) and my orientation is \(\theta=90^{\circ}\), both in relation to the parent frame (ie the back-left corner of my living room).
In addition to specifying the exact location of the parent reference frame (ie the back-left corner of my living room), I also need to specify the child reference frame. When your pose is \((x, y) = (2, 1)\) and \(\theta=90^{\circ}\), does that refer to your hand being at this pose? Your head?
In this example, we will specify the point between your feet to be the child reference frame. To start introducing some ROS nomenclature, let's call this frame the base_link frame - often specifying the main base coordinate frame of a robot.

Assuming the readers of this post are familiar with coordinate geometry, we want to note that ROS uses the right-hand coordinate system. And generally, the positive x-axis points out towards the front of the object (ie a robot, person, tree, etc), positive y-axis points out the left of the object, resulting in the positive z-axis pointed straight up above the object. For mostly all Hadabot related examples, we ignore the z-axis and limit ourselves to a planar 2D world.
From the base_link frame (the point below my head, between my legs), my left foot is about 0.1 meters to the left (recall, left is towards the y axis), and oriented counter-clockwise \(45^{\circ}\) in relationship to the base_link frame (ie the point between your feet). Therefore, the pose of your left foot is \((x, y) = (0, 0.1)\) and \(\theta=45^{\circ}\) in relation to the base_link parent frame.
But where is your left foot in relationship to the back-left corner of the living room? After some simple math (or a quick glance at the diagram above), we would conclude that the pose of your left foot is \((x, y) = (1.9, 1)\) and \(\theta=135^{\circ}\) in relation to the back-left corner parent frame of the living room.
The ROS tf2 package (which is version 2 of the original tf package - I think "tf" is an acronym for "transform frame") manages all your ROS robot application's coordinate frames. Tf2 also handles the math involved in transforming the pose of one frame to the pose of another frame. Our living room example is pretty simple. But once you have a handful of sensors, servo arms, linkages, tf2 becomes extremely powerful in helping you manage coordinate frames.
Along with coordinate frame management, tf2 is also a standardized way for other ROS packages, such as Navigation2, to know what the various poses and reference frames are for your specific ROS robot application. This allows your robot to make use of Navigation2 without specifically having to make Navigation2 calls in your robot code!
3.1 Other standard ROS coordinate / reference / transform frames
In the living room example above, we defined the main base_link. For ROS, the base_link is often-times the main reference frame for your robot. It is usually at the centroid location of the robot but doesn't necessarily have to be. For the Hadabot Turtle robot, base_link would be the mid-point between the 2 drive wheels on the surface of the floor.
In addition to the base_link, Navigation2 also requires 2 other reference frames - the odom and map frame. In our example the odom frame could be the living room. As the robot moves and publishes out its odometry, the base_link will change its pose in relation to the odom parent frame.
The map frame is a more fixed location of a defined map area the robot will be navigating. Although somewhat contrived, you can consider the map frame to be of, say, the San Francisco region. Our odom living room is a child frame to the map parent frame. If we happen to be holding a GPS, each time we get a GPS reading, we can update odom in relation to the map frame. In our contrived example, the GPS reading can change either to GPS noise or perhaps a earthquake that moves our living room. In either case, you will notice the odom frame "jump" around in relationship to its parent map frame.
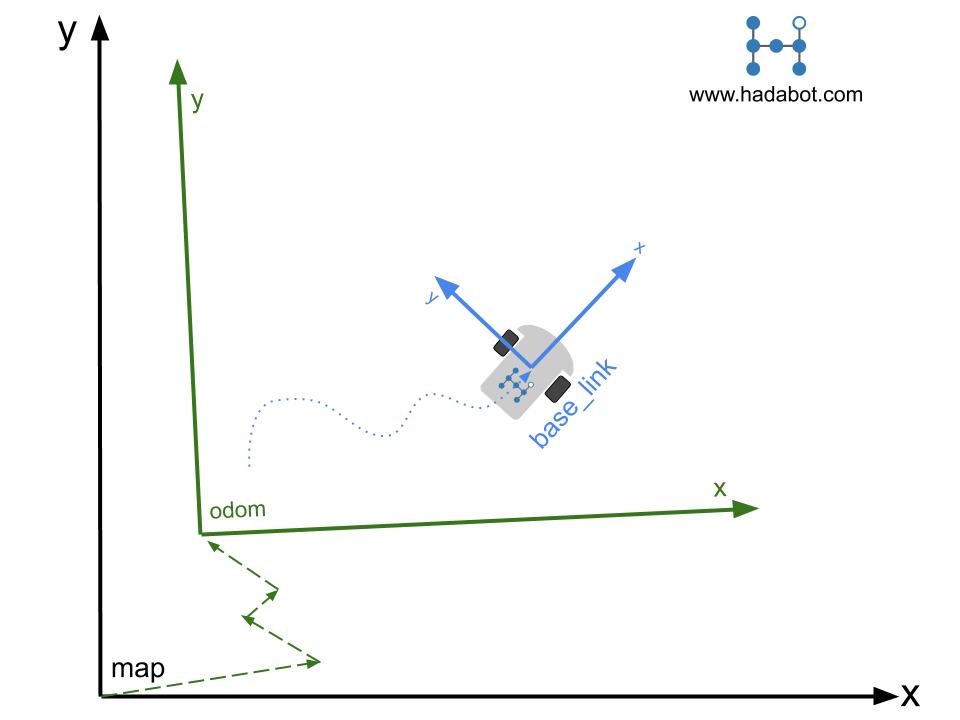
In summary, GPS readings (or any other sensor that updates "every now and then") will update odom's pose within the parent map frame. These sensors will cause odom to jump around within the map frame. The base_link's pose within the parent odom frame is updated with continuous sensor readings such as from wheel odometry, IMU's, etc., resulting in smooth changes in base_link's pose in relation to the parent odom frame as the robot moves along in time.
5. How is tf2 used in ROS 2 Navigation?
In our turtlesim Navigation2 example's hadabot_launch_nav2.py launch file, there is a directive to launch a hadabot_tf2_broadcaster node in that python launch file. If you open ~/hadabot_main/content/p8/hadabot_ws/src/hadabot_tf2/src/hadabot_tf2_broadcaster.cpp, you will see the source code that implements the node. Specifically in void pose_callback(...), you'll see the code that assembles ROS messages and publishes the pose for the base_link to odom frames, and odom to map frames.
You'll notice that there are no specific Navigation2 calls or references to Navigation2. The tf2 library allows a robot application to not need to care about the Navigation2 packages. Nor does Navigation2 need to know about the specific robot application either. Navigation2 simply subscribes to the tf2 broadcasted messages to know about the poses of our base_link, odom, and map frames. With these poses, it can adjust the path / trajectory and continue to publish updated Twist messages via the /cmd_vel topic to direct the robot towards the specified goal pose.
5.1 The tf2 TransformBroadcaster object
Let's take a closer look at hadabot_tf2_broadcaster.cpp file.
The origin of the turtlesim world is at the lower-left corner of the application window - the odom frame. When turtlesim first starts up, it's pose is somewhere in the middle of the application window, or odom frame. Because turtlesim is a simulation, it has god-like awareness of its actual pose. Turtlesim publishes out its pose as a turtlesim/msg/Pose message via the /pose topic.
In the HadabotTF2Publisher(...) constructor:
-
You'll see us subscribe to
/poseand bind thepose_callback(...)function as the callback function. -
Create a
tf2 TransformBroadcasterobject calledtf_broadcaster_to publish the poses of the various reference frames out to the tf2 system.
The TransformBroadcaster object is the tf2 utility function that the ROS system uses to broadcast the poses of various reference frames in relationship to each other as geometry_msgs::msg::TransformStamped messages.
In pose_callback(...), we will:
-
First create 2 geometry_msgs::msg::TransformStamped messages -
base_link_tfandodom_tf. -
Assemble the
base_link_tfmessage:-
We need the position of our turtlesim (ie
base_link). We can grab the position directly from the turtlesim/msg/Posemsgvariable. -
For turtlesim's orientation, we need to convert the euler angle passed in as
msg->thetato a quaternions which is what is required by the TransformStamped message. -
Specify that this pose refers to the
base_linkchild frame, in relation to theodomparent header frame.
-
-
Publish out
base_link_tfmessage using thetf_broadcaster_. -
Assemble the
odom_tfmessage:-
The position and the orientation of the
odomframe will always 0. -
Specify that this pose refers to the
odomchild frame, in relation to themapparent header frame.
-
-
Publish out
odom_tfmessage using thetf_broadcaster_.
Since we don't have any GPS data, the odom frame's pose is always \((x, y) = (0, 0)\) and \(\theta=0.0\) in relation to the map frame. When we start to incorporate sporadic positioning sensor data (via sensor fusion), such as from a GPS, the odom frame will have different poses in relation to the map frame.
Unaware of turtlesim, Navigation2 simply receives the TransformStamped messages and acts on those messages, publishing out the Twist messages. Turtlesim, unaware of it being controlled by Navigation2, simple acts on the Twist messages it receives via the /cmd_vel topic, and moves accordingly. Tf2 acts like an API, intermediary between turtlesim and Navigation2 allowing all the ROS components to work in a distributed manner! That's the beauty of the ROS design!
5.2 Try to implement the tf broadcaster yourself
We included a file hadabot_tf2_broadcaster_diy.cpp with a nearly-empty void pose_callback(...) routine. Feel free to take what you just read to implement the pose conversions and tf2 broadcast functionality yourself.
Follow the README.md instructions on how to implement, compile, and execute the code your wrote!
7. Conclusion
Thanks for reading along. In this post we did the following:
-
Learned about the turtlesim, tf2 and Navigation2 ROS packages.
-
Ran an example where Navigation2 controlled the turtlesim simulator.
-
Walked through the code that uses a
tf2 TransformBroadcasterto publish out turtlesim's pose.
In future posts, we will continue down 2 paths to:
-
Understand how the various pieces of the Navigation2 stack works.
-
Understand a bit more about the theory behind robot navigation. When we move back to using the real Hadabot Turtle, we will have to deal with the uncertainties of sensor data and reality. Then we will truly start to appreciate the probabilistic approaches to navigation.
For those who want to learn more on their own, some of what's implemented in the Navigation2 package are concepts taught from the seminal textbook Probabilistic Robotics by Sebastian Thrun, Wolfram Burgard, and Dieter Fox.
Thanks again for following along. If you enjoyed the post, there are 2 ways to continue to learn with Hadabot:
-
Sign up to stay in touch (via the Stay in Touch buttons above and below) with future post updates, as well as promos and giveaway opps.
-
Purchase a Hadabot Turtle kit to start your robotics adventures!
Thanks and happy building!
Jack "the Hadabot Maker"